Introduction
I’ve been a huge Prismic fan ever since I’ve started to explore headless CMS solutions in the GatsbyJS plugin ecosystem. With plenty of CMS options out there, Prismic is one of the best entry-level value and easiest CMS to setup if you already have a functional front end.
However, one of the challenge I had while transitioning from GatsbyJS to AstroJS is relearning how to integrate different technology stack together. To make it worse, some popular services do not provide any official or community-contributed library to make the integration easier.
In the case of integrating Prismic with AstroJS, as most of the online tutorial and repository are already outdated (e.g. still in Snowpack era, using older Prismic client), it becomes a challenge when integrating preview, where you have to architect your own solution with cookies and routing.
Luckily enough, I was able to find some old discussion (Forum 1: Live previews for astro.js | Forum 2: Previews with Astro) and piece the solution together, which I’ll be sharing below.
Background
Goals
If you’re using a CMS, chances are you’re structuring your project to generate dynamic pages. Hence, we’ll only talk about integrating Prismic Previews with:
- Repeatable Types like blogs
- Dynamic pages that looks like hardcoded page, like home and about page.
I’ll not go in-depth on Prismic repo configuration, such as setting up custom type to creating draft content.
Materials
You can find the sample repository here, which is a forked version of Nate Moore’s repository. In my sample repository, you can find that that I’ve updated the dependencies and some Prismic client implementation.
Disclaimer: As I’m creating a guide based on Nate’s Prismic Repository, do note that I only have access to his AstroJS repo, not the connected Prismic repo. I encourage you to create a Prismic repo, alongside your AstroJS project. As you read through the guide, replicate the code example into your project and frequently test if the preview works.
Important Notes
-
Don’t confuse Live Preview with Prismic Preview: The former requires you to setup Slice Machine with its new page builder (not available for AstroJS yet), while the latter opens your saved draft in a new tab, like this video. In this guide, we’ll be looking at Prismic Preview.
-
This is not a copy-and-paste guide: You can code along the given example and refer to the forked repository whenever you’re confused, however, some code might require minor tweaks to suit your project.
Integrating Prismic Preview with Astro
Step 1: Configure your Prismic repository for Live Preview
On your Prismic repository sidebar, locate Settings.
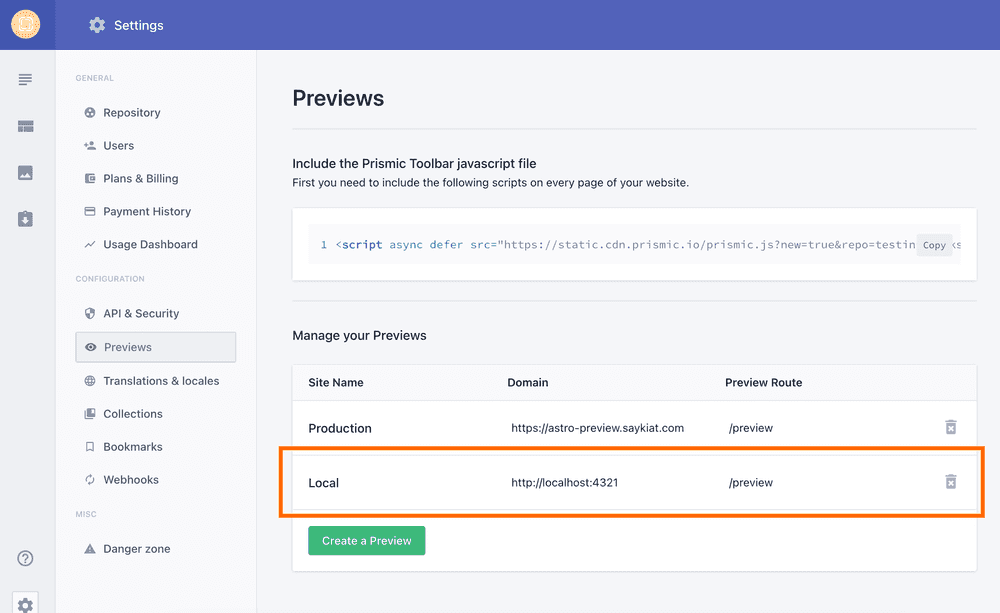
Then on the next page, locate Previews. You’ll need to create few kind of Previews:
- Production: This is for previewing draft on via where you’ve setup your project, such as Netlify or Cloudfare Pages. Because of that, you can add your own domain in the domain field.
- Local: This is to preview draft on your local environment (hence domain is http://localhost:4321). We’ll be interacting with this preview mostly in this guide.
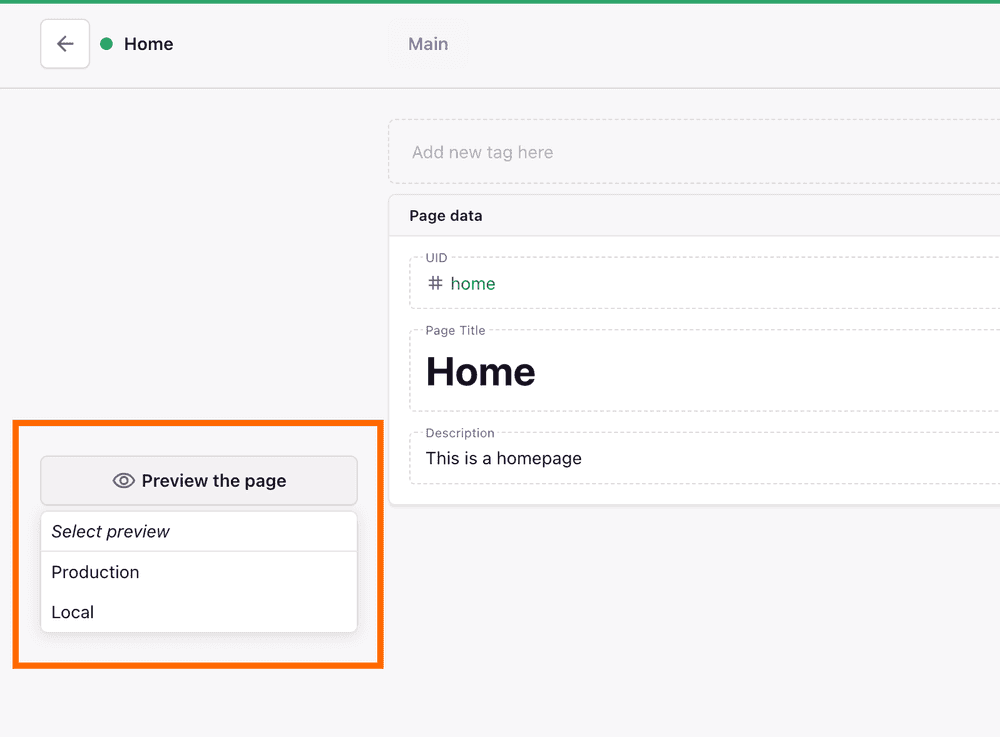
Once saved, verify the changes by navigating to any active Prismic document you have. You’ll see the 2 preview mode, i.e. “Production” and “Local” under the Preview the Page button. For now, we won’t be pressing any of those buttons.
Step 2: Configure your AstroJS project with clients and adapters
On your Prismic project, install the @prismicio/client dependency to fetch and query data from Prismic later.
npm i @prismicio/clientThen, install the node adapter, or any adapter from your hosting provider, e.g. Netlify or Cloudfare Pages.
npx astro add nodeAfter that, ensure your Astro config is setup with server rendering mode, like the following.
import { defineConfig } from "astro/config";import node from "@astrojs/node";
export default defineConfig({  output: 'server',  adapter: node({    mode: "standalone"  })});
From this point onward, you can start running your project using npm run dev and preview your project on local environment.
Then, create a prismic.ts file under your src directory. This file contains all utility function to fetch Prismic data.
import * as prismic from "@prismicio/client";//Modify this endpoint to suit your project. You can find it in your Prismic Repo > Settings > API & Security > API Endpointconst API_ENDPOINT = "https://astro-prismic-demo.prismic.io/api/v2";
export const client = prismic.createClient(API_ENDPOINT);
//Fetch all data from custom type === "blog_post"export async function getAllPosts() {    return client.getAllByType('blog_post');}
//Fetch data from custom type === "page". We'll have to specify the UID of the page. This kind of page looks like harcoded static page, but is actually dynamic.export async function getPage(uuid: string) {    return client.getByUID('page', uuid, { pageSize: 1, page: 1 });}
Step 3: Populate data from Prismic to Astro
Now we can start to populate some data to your AstroJS project from the Prismic repository.
However, before we do that, you might want to create some custom type and add dummy data first before proceeding with the following steps. We’ll assume your data structure is similar to this the example API endpoint from Nate’s Prismic repository.
After that, we can fetch the “homepage” data like below:
---export const prerender = true;
import * as prismic from "@prismicio/client";import { getPage } from '../prismic.ts';
const doc = await getPage('home');
const text = prismic.asText(doc.data.heading);---
<h1>{text}</h1>
Then on the individual blog post pages, you can fetch the data of each post like below:
---export const prerender = true;
import * as prismic from "@prismicio/client";import { getAllPosts } from '../../prismic.ts';
export async function getStaticPaths() {  const posts = await getAllPosts();  return posts.map(post => {    return { params: { slug: post.uid }, props: { post }}  })}const { post } = Astro.props;
let title = post.data.title;---
<h1>{text}</h1>
Step 4: Setup Prismic Preview on Astro (and duplicate some code)
Now that we’re able to populate data from Prismic, it’s time to setup preview so we can utilise the “Production” and “Local” buttons we’ve setup earlier.
Remember that we’ve set the preview route to be /preview earlier? We have to reflect that on our AstroJS project. We’ll create a preview page that act as a route resolver (Read more from official documentation). Remember to change the highlighted code below.
<!doctype html><html>  <head>    <title>Preview route</title>
    <!-- IMPORTANT: Modify this to suit your project. You can find your Preview Toolbar script on your Prismic Repo > Settings > API & Security > Previews -->    <script async defer src="https://static.cdn.prismic.io/prismic.js?new=true&repo=astro-prismic-demo"></script>    <script type="module">      import { createClient } from "https://cdn.skypack.dev/@prismicio/client";
      const init = async () => {        const defaultURL = "/";
        // Documentation: https://prismic.io/docs/preview-drafts-vanilla-javascript        const url = await createClient("astro-prismic-demo",)            .resolvePreviewURL({          linkResolver: (doc) => {            if (doc.isBroken) {              return "/404";            } else if (doc.type === "blog_post") {              return `/preview/posts/${doc.uid}`;              // To preview any hardcoded dynamic page like "home", insert the document ID directly. You can find the ID by viewing your API endpoint.            } else if (doc.id === "YTvNMxMAACwA5WXh") {                return `/preview/page/home`;                //IMPORTANT: any text that comes after /page/* have to match the route in your Astro project. In this case, the browser will look into /src/pages/preview/home.astro            }            // add more pages (a.k.a redirects) ...            return defaultURL;          },          defaultURL: defaultURL,        });
        window.location.replace(url);      };      init();    </script>  </head>  <body>    <h1>Loading Preview...</h1>  </body></html>
Then, let’s create the routes for the mentioned pages in the preview folder.
Do note Prismic Preview will require Astro’s cookies API as seen with the previewCookie variable, so that Prismic is able to render content with the saved draft data.
For the homepage, we’ll implicitly fetch the home data, as highlighted below:
---import { client } from '../../../prismic.ts';import * as prismic from "@prismicio/client";
const previewCookie = Astro.cookies.get("io.prismic.preview")?.value;
if (!previewCookie) {  return Astro.redirect("/404");}
const page = await client.getByUID('page', 'home', { pageSize: 1, page: 1, ref: previewCookie });
if (!page) return Astro.redirect("/404");
const doc = page;
let title = prismic.asText(doc.data.heading);---<h1>{title}</h1>
For the blog post, we’ll fetch all the blog_post data, as highlighted below:
---import { client } from '../../../prismic.ts';
const previewCookie = Astro.cookies.get("io.prismic.preview")?.value;
if (!previewCookie) {  return Astro.redirect("/404");}
// https://docs.astro.build/en/guides/routing/#server-ssr-modeconst { slug } = Astro.paramsconst posts = await client.getAllByType('blog_post', {ref: previewCookie})
const page = posts.find((post) => post.id === slug);if (!page) return Astro.redirect("/404");
const { post } = Astro.props;
let title = post.data.title;---
<h1>{title}</h1>
That should be it. Now go to your Prismic repository and change the title for any the pages, save the change and preview the page on via the Local button.
A new tab should open and display the latest title. 🚀
Step 5: Test on Production
If it works on local, then it’s time to test the Primsic Preview on production. This will require you to host the project on services like Netlify or Cloudfare pages.
For the project to build and preview properly, ensure that you’ve configured the right adapter that suits your hosting platform. You can find a list of most common AstroJS adapters on their documentation.
Once you’ve built your project on the cloud, you should be able to preview your via the Production button.
Last but not least: configure webhook to build project when publish content
What’s left is to setup a webhook so that your project can build after you’ve published a project. You can read more about that on Prismic’s official guide.
I hope this guide helps. If you encounter any difficulty or error, please reach me out via email!